You can perform several operations on contours while in Contour mode.
Select contours
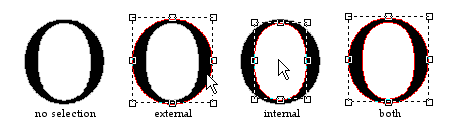
To select an external contour of a black area of a glyph click within the black area. To select an internal contour of a black area click within the internal white area.
To select more than one contour, press and hold down the Shift key while selecting contours. Another way is to click on the workspace where no contours are and, while holding down the left mouse button, drag a rectangle around all contours you want to select simultaneously.
Use the Ctrl-A shortcut or select Select All from the Edit menu to select all contours. Holding down the Shift key and clicking a contour already selected will remove that contour from the current selection.
Resize selected contours
When you select one or more contours, a box with “resizing handles” shows up around the selected contour(s). Click and drag one of those resizing handles to change the size of the selected contour(s). By default the selected contour(s) remain proportional to the original size, as you resize it. Press the Shift key while you drag one of the resizing handles located at the corners to resize freely.
Move selected contours
To constrain a selection so it moves only horizontally or vertically, press Shift as you drag the selection. Press Alt to ignore the snap to grid and snap to guidelines features.
Duplicate selected contours
To copy selected contours to a new position, hold down the Ctrl key as you drag the selection. Hold the Alt key to ignore the snap to grid and snap to guidelines features. Hold down the Shift key to move only in vertical or horizontal direction. Any combination of these keys is allowed.
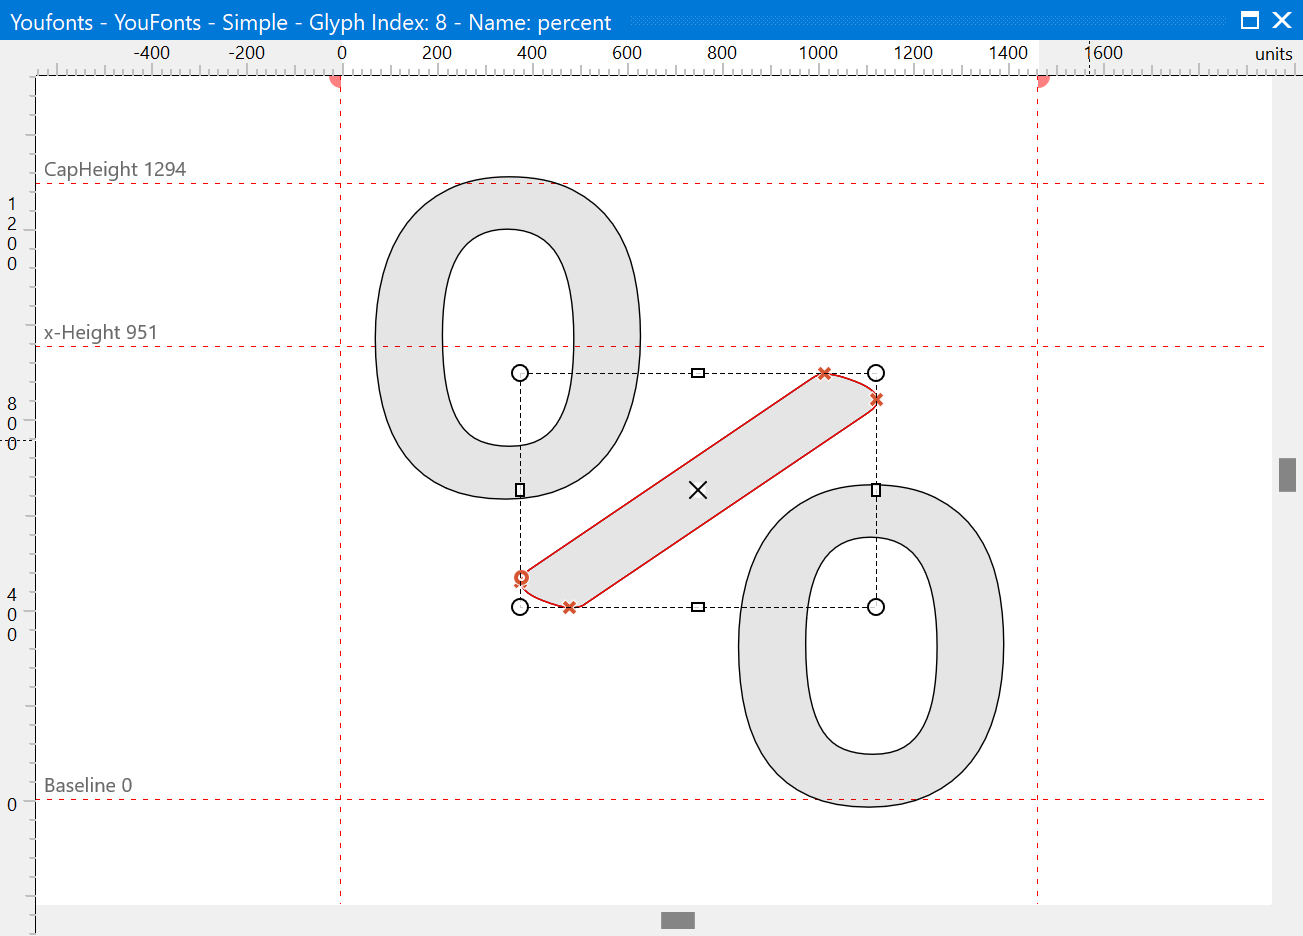
Rotate and skew selected contours
You can rotate by first selecting a contour (or more) and then select it again (don’t double-click). Alternatively press Key T to toggle between Move and Rotate and Skew mode. The little rectangles on the corners will change into circles. These can be used to rotate the selected contour(s). The other four rectangles are used to skew the selection. To change the origin for the rotation you can move the little cross in the middle of your selection. To rotate by 15° steps, hold down the Shift key while rotating the selected contours. If Shift is held down on the skew operation, then it will skew by 1° steps.
Convert between Quadratic and Cubic Contours
As mentioned in the simple glyphs introduction, a contour is either made out of quadratic or cubic Bézier curves. When you perform tasks like adding contours, FontCreator will add such contours as either quadratic or cubic, based on the TrueType/OpenType Outline Format setting in the Font Export Settings dialog.
If you wish to convert existing quadratic contours to cubic or vice versa, then select the contours, right-click to open a context menu from where you can select Convert.
Adding Contours and Outlines to a Glyph
Here are some ways to add a contour:
Rectangle and Square
To draw a rectangle, click the Rectangle toolbar icon on the Drawing toolbar. Then click within the Glyph panel to set the first corner of the rectangle. While keeping down the left mouse button, move to the opposite corner of the rectangle, and then release the left mouse button. If you want a perfect square, keep the Shift key down while defining the rectangle.
Ellipse and Circle
To draw an ellipse, click the ellipse toolbar icon on the Drawing toolbar and follow the same procedure as described with the rectangle above. Use the Shift key to make a perfect circle. Since outlines are made out of Bézier curves, and such curves can’t be used to make a 100% perfect circle, FontCreator will use 12 points which is good enough for most situations. If drawing a circle or ellipse larger than the em square (units per em as defined on the General tab on the Font Properties dialog) it will appear with 20 (quadratic) or 24 (cubic) nodes to provide even more precision.
Insert a New Custom Contour
To insert a new contour, select Contour from the Insert menu. Click with the left mouse button to add points. You can create a curve if you hold down the mouse button while moving it around. With quadratic based contours you can also click the right mouse button to add an off-curve point. Creating points while holding down the Shift key generates straight lines (horizontal or vertical). After you have created your contour you press the Apply button.
Contour Direction
If you add a rectangle, square, ellipse, circle or a new custom contour, FontCreator will decide the contour direction, unless it is overlapping another contour. You can always change the direction of a contour if needed.
More Ways to Add Outlines (Contours) to a Glyph
There are several other ways to add outlines (contours) to a glyph:
•Using the Free Draw Contours tool.
•Drag and drop a glyph from the Samples panel into a Glyph panel.
•Copy contours from other glyphs, even from other fonts and paste them. (These operations carried out in their respective Font or Glyph panels)
•Import a stored vector or bitmap file of an image of a glyph into a Glyph panel using Import in the Tools menu.
•Paste a Clipboard image of a glyph into the Glyph panel. The Clipboard image could be created in another application which has graphics editing capabilities e.g. a cropping function. This operation is performed using the Paste option in the Edit menu.
Optimize Contour
This advanced feature will try to reduce the number of points that make up the contour(s).
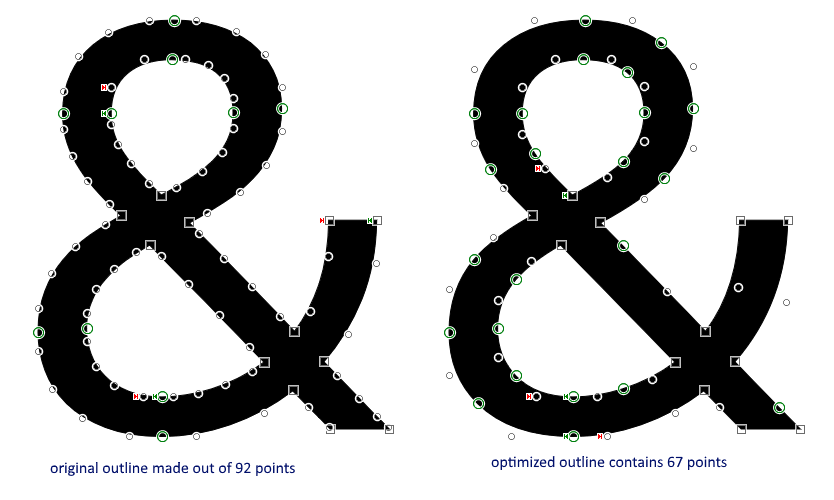
Note: the optimize contour feature might slightly change the original outline, so do experiment with it to ensure it suits your needs. At all times you can make use of undo and redo, so it should be easy to compare the optimized contours with the original outline.
Open Contours
The OpenType specification only allows for closed contours. To better assist with designing single line fonts for CNC engraving, we’ve added a special feature which allows you to work with open contours. This can be enabled from on the Font tab in the Options dialog.
In FontCreator open contours will only work with TrueType based outlines. Select a contour, then right-click to select Toggle Open Contour. The contour will be open if the first and last points of the contour are both on-curve.
If you want the contour to be open between two other adjacent points, select the one which comes right after the other (thus select the one which has a point index that is one more than the other) and right-click to select First Point.
See also: